Although I don’t like and I am against facial recognition in it’s popular context – public space surveillance, use on social platforms, etc. – it is undoubtedly an interesting topic. So I decided to experiment with it.
One strict requirement was to have it running locally on my machine, offline, without contacting any external services.
While searching I have found quite a few outdated libraries, examples and outdated or unnecessarily complex tutorials.
In this post I am using an up-to-date Ubuntu, up-to-date Python and the latest face_recognition library (that uses the dlib machine learning library).
I also try to focus on getting it working as simple as possible and then add the extras and optimizations.
All versions are available in the GitHub repository: https://github.com/gheja/face-recognition-test/
The goal
My goal is to have known people recognized on photos, given a (smaller) set of photos of them.
The second goal is to find unrecognized faces and group them by person. Then we can mark them as known people and find them in other photos.
Terminology used
Face detection – finding one or more faces in an image.
Face recognition – finding the person for a detected face from a known set of faces.
Clustering – arranging detected faces into groups based on facial features (without knowledge of the person).
Facial encoding – an array holding numeric data based on facial features extracted from a face.
Setting up the environment
My test environment is a live Ubuntu 20.04 LTS system.
First we need to enable the universe apt repository that contains the community-maintained free and open-source software to be able to install pip (the package installer for Python). This will also update the apt cache so no need for apt update.
Then we will install python3-pip for managing the Python packages and cmake to be able to compile some modules.
After this we can install the face_recognition and the scikit-learn packages and we can start working. The latter is needed only for clustering.
sudo add-apt-repository universe
sudo apt install python3-pip cmake

pip3 install face_recognition scikit-learn
Finding and recognizing known faces
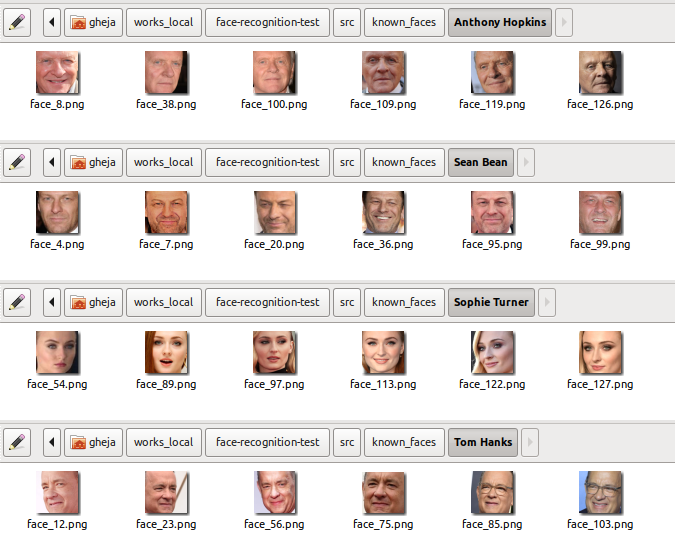
To recognize faces first we need to have a list of known faces. The script searches the known faces in the known_faces directory, grouped by person in a sub-directory, holding the files. For example:
known_faces
  Alice Test
    alice_1.jpg
    ms_test.jpg
  Bob Test
    bobby.jpg
First we import the required modules, save the current path to a variable (the script will use this as the base directory when searching for files), then prepare the global variables to hold the known faces and names:
import os
import numpy as np
import face_recognition

base_dir = os.getcwd()
known_face_encodings = []
known_face_names = []
Let’s create a load_known_faces() function that gets a list of all directories and files and opens the files one by one to find the faces in each, then picks the first and stores its encoding in known_face_encodings and their corresponding names in known_face_names.
def load_known_faces():
	print("Loading known faces...")

	os.chdir(os.path.join(base_dir, "known_faces"))

	for root, dirs, files in os.walk('.'):
		for f in files:
			filename = os.path.join(root, f)

			print("  {} > {}".format(root, f))

			image = face_recognition.load_image_file(filename)

			# Search for all the faces
			face_locations = face_recognition.face_locations(image)

			# Pick the first one and get its encoding
			face_encodings = face_recognition.face_encodings(image, [ face_locations[0] ])

			# Store the processed face
			known_face_encodings.append(face_encodings[0])
			known_face_names.append(os.path.basename(root))
With this we have all the known faces loaded, next task: recognizing them on unknown pictures.
Let’s create a recognize_faces() function that searches for the images to be processed in the test_images directory, then loads them one by one, searches all the faces in each, extracts the facial features and then calculates the likeliness to every known face. It then picks the nearest match (if good enough) and displays the corresponding name and confidence value.
def recognize_faces():
	print("Detecting and recognizing faces...")

	os.chdir(os.path.join(base_dir, "test_images"))

	for root, dirs, files in os.walk('.'):
		for f in files:
			filename = os.path.join(root, f)

			image = face_recognition.load_image_file(filename)

			print("  {}: processing...".format(filename))

			# Search for all the faces
			face_locations = face_recognition.face_locations(image)

			# Then calculate their encodings
			face_encodings = face_recognition.face_encodings(image, face_locations)

			# Loop through each face found in the unknown image
			for (top, right, bottom, left), face_encoding in zip(face_locations, face_encodings):
				name = "Unrecognized"
				confidence = 0

				# Find the distance of the face to every known faces. Distance is 0.0 at an exact match
				# and gets higher with the distance, can be more than 1.0
				face_distances = face_recognition.face_distance(known_face_encodings, face_encoding)

				# Use the known face with the smallest distance to the new face
				best_match_index = np.argmin(face_distances)

				# If there is a possible match
				if face_distances[best_match_index] < 0.6:
					name = known_face_names[best_match_index]

					# Confidence is the opposite of distance
					confidence = 1 - face_distances[best_match_index]

				print("    found {} with confidence {:.2f}".format(name, confidence))
Then just call these functions.
load_known_faces()
recognize_faces()
And that’s it for the basics and if all goes well. I have uploaded the script as recognize_v1.py.
Now it’s a good time to add some checks if images could be loaded correctly, faces could be detected, etc., see recognize_v2.py.
Highlighting recognized faces on pictures
I think the next logical step is to not just print the detected faces but show them on the picture.
Fortunately the face_locations array holds the top-left and bottom-right coordinates of the faces, we also got the best matches for them and the Pillow library (python module named PIL) can easily draw on images.
First we need to import the PIL and PIL.ImageDraw modules:
import PIL
import PIL.ImageDraw
Then after loading the image in recognize_faces() we create a PIL.ImageDraw.Draw to work with:
# Convert the image to a PIL-format image so that we can draw on top of it with the Pillow library
# See http://pillow.readthedocs.io/ for more about PIL/Pillow
image2 = PIL.Image.fromarray(image)

# Create a Draw instance to draw to
draw = PIL.ImageDraw.Draw(image2)
Then in the loop over the faces we draw a rectangle around the current face and write the confidence value and the name of the best candidate, optionally with colors depending on the quality of the match:
if confidence >= 0.5:
	color = (0, 190, 0)
	color2 = (255, 255, 255)
elif confidence >= 0.35:
	color = (0, 120, 190)
	color2 = (255, 255, 255)
elif confidence >= 0.25:
	color = (0, 0, 120)
	color2 = (255, 255, 255)
else:
	color = (30, 30, 30)
	color2 = (90, 90, 90)

# Draw a box around the face
draw.rectangle(((left, top), (right, bottom)), outline = color)

# Draw a label with the name below the face
text_width, text_height = draw.textsize(name)
draw.rectangle(((left, bottom), (right, bottom + text_height)), fill = color, outline = color)
draw.text((left + 6, bottom), "{:.2f} {}".format(confidence, name), fill = color2)
And right after finishing the processing of the image we save the copy with the highlights in the annotated_images directory:
# Remove the drawing library from memory as per the Pillow docs
del draw

# Save the annotated image
outputName = os.path.join(base_dir, "annotated_images", f)
image2.save(outputName)
Note: the annotated_images directory is not emptied before run, the files there will be retained or overwritten.
The full source code is available as recognize_v3.py.
See an test run of this version in the last section of this post below.
Clustering faces automatically
It would be nice to collect all the unrecognized faces and group them by person, wouldn’t it? This is what clustering is for.
Sidenote: So far we searched for people we “labeled” manually earlier for the script, this is supervised learning. If we want to group similar faces, we either need to supply how many groups (people) we want or use unsupervised learning to do it automatically. In this post we want the latter by using DBSCAN (density-based spatial clustering of applications with noise).
First we need to import the DBSCAN clustering from scikit-learn library (python module named sklearn):
from sklearn.cluster import DBSCANThen add an array to hold the unrecognized faces:
unrecognized_faces = []Then in recognize_faces() add the faces to the array:
if name == "Unrecognized":
	unrecognized_faces.append({
		"face_location": (top, right, bottom, left),
		"face_encoding": face_encoding,
		"filename": filename
	})
And now everything is ready for clustering.
Clustering is really simple thanks to the scikit library, it just needs the faces in an array and two parameters: min_samples – telling how many faces needed at least to form a group, and eps – telling how far the faces needed to be at most to be considered in that group.
After this we copy the faces into separate PNG files (to retain as much detail as possible), grouped by person in directories. The directories will be named person_0, person_1, etc. with an exception for the rest: unclustered.
For example, after processing three test pictures with 6 faces in total we should get similar results:
test_images
  group_photo_1.jpg
  group_photo_2.jpg
  group_photo_3.jpg

clustered_faces
  person_0
    face_1.png
    face_2.png
    face_5.png
  person_1
    face_3.png
    face_6.png
    face_7.png
  unclustered
    face_0.png
    face_4.png
def cluster_unrecognized_faces():
	print("Clustering unrecognized faces...")

	if len(unrecognized_faces) == 0:
		return

	encodings = []

	# Create an array suitable for DBSCAN conaining only the encodings
	for face in unrecognized_faces:
		encodings.append(face["face_encoding"])

	# Group at least 3 faces ("min_samples") with a maximal distance
	# of 0.5 ("eps"). From a few runs these numbers seems to be working
	# well for me. Your case may vary so try to tune these if you don't
	# like your results.
	#
	# For more info see:
	#   https://scikit-learn.org/stable/modules/generated/sklearn.cluster.DBSCAN.html
	clt = DBSCAN(metric="euclidean", n_jobs=-1, min_samples=3, eps=0.5)
	clt.fit(encodings)

	print("Saving clustered faces...")

	face_index = 0
	for face in unrecognized_faces:
		person_index = clt.labels_[face_index]

		if person_index == -1:
			name = "unclustered"
		else:
			name = "person_%d" % (person_index)

		filename = os.path.join(base_dir, "test_images", face["filename"])
		clustered_filename = os.path.join(base_dir, "clustered_faces", name, "face_%d.png" % (face_index))

		# Create the directory for this person if needed
		if not os.path.exists(os.path.dirname(clustered_filename)):
			os.makedirs(os.path.dirname(clustered_filename))

		try:
			image = face_recognition.load_image_file(filename)
		except:
			print("{}: failed to load, skipping.".format(filename))
			continue

		(top, right, bottom, left) = face["face_location"]

		# Convert the image to a PIL-format image so that we can draw on top of it with the Pillow library
		# See http://pillow.readthedocs.io/ for more about PIL/Pillow
		image2 = PIL.Image.fromarray(image)

		# Crop the image to the face
		image2 = image2.crop((left, top, right, bottom))

		image2.save(clustered_filename)

		face_index += 1
As a last step we need to call this function after recognize_faces() collected the unrecognized faces:
cluster_unrecognized_faces()And we’re good to go.
After running the script we can examine the grouped faces, correct them manually if needed and move to a sub-directory of known_faces to be able to recognize these people next time.
Note: the clustered_faces directory is not emptied before run, the files there will be retained or overwritten, the new and old faces might mix for subsequent runs. It is a good idea to clear it by hand before running the script.
The full source code is available as recognize_v4.py.
Optimizations
As the locating and encoding of faces take the most significant time it is a good idea to store their results instead of running them on each images every time – for this I added pickle and store the data in known_faces_cache, if there is a stored version available the program uses it, otherwise it processes the image and stores the result for next use. See recognize_v5.py.
Processing a huge image can take considerably longer time so adding a resize that limits to 1200×1200 pixels might be a good idea, this is what load_image() does. See recognize_v6.py.
Also, dlib (the library that face_recognition uses) supports two methods for face detection: HOG+SVN (histogram of oriented gradients and linear support vector classification) and CNN (convolutional neural network). The first one is called “hog”, it’s reasonably fast on CPU and is the default; the second one is “cnn”, it is more accurate for faces in non-ideal angles, uses more memory and it is strongly recommended to have a GPU with CUDA support. To use “cnn” modify the face_recognition.face_locations(image) to face_recognition.face_locations(image, model="cnn"). Also, “cnn” supports batch processing, too. Read more at CNN based face detector from dlib and the docs.
My test runs and conclusion
I started my tests by adding several photos (5 to 8) of a few actors and actresses, all out of character and from the last few years (2018-2020). Sources were like Wikipedia, Oscar galas, etc.
After running the script I moved the clustered images from clustered_faces to known_faces with the proper names – without manually correcting anything else.
Then I collected a few photos, mostly from posters, stills from movies and episodes, etc. and ran the script.
It surprised me how accurately it recognized the faces. So I added a few more pictures, with non-ideal angles, partially covered faces, ones with sunglasses, older ones (shot 10 or even 29 years earlier) and… see for yourself below.
(Click on a photo to open gallery.)

Face recognition test with Gwendoline Christie, Emilia Clarke, Lena Hadley and Sophie Turner, recognized correctly 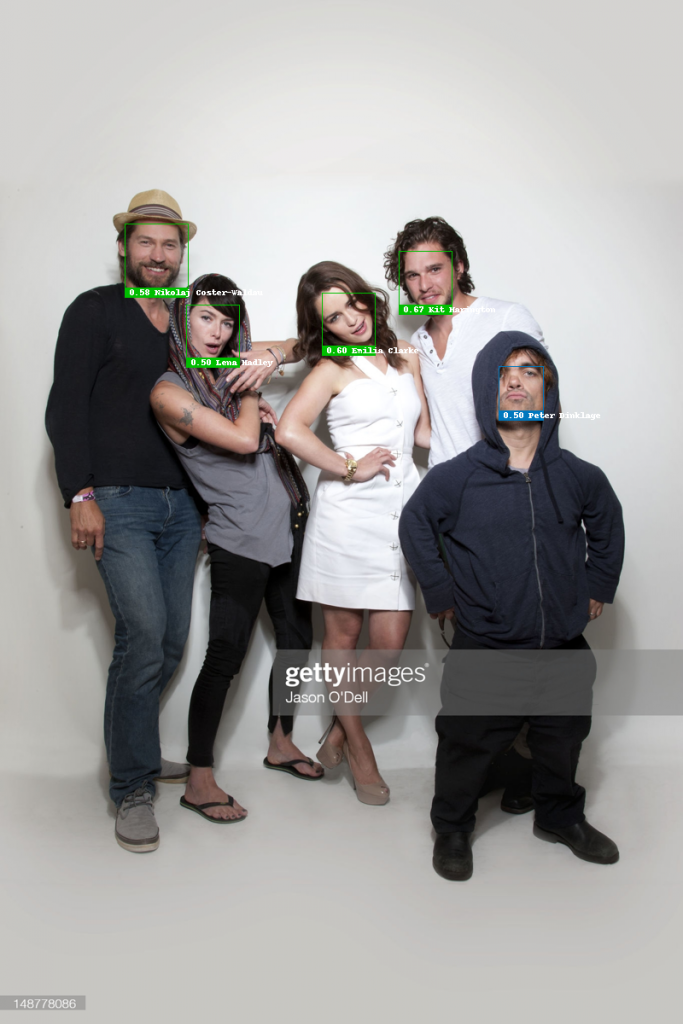
Face recognition test with Nikolaj Coster-Waldau, Lena Hadley, Emilia Clarke, Kit Harington and Peter Dinklage, recognized correctly 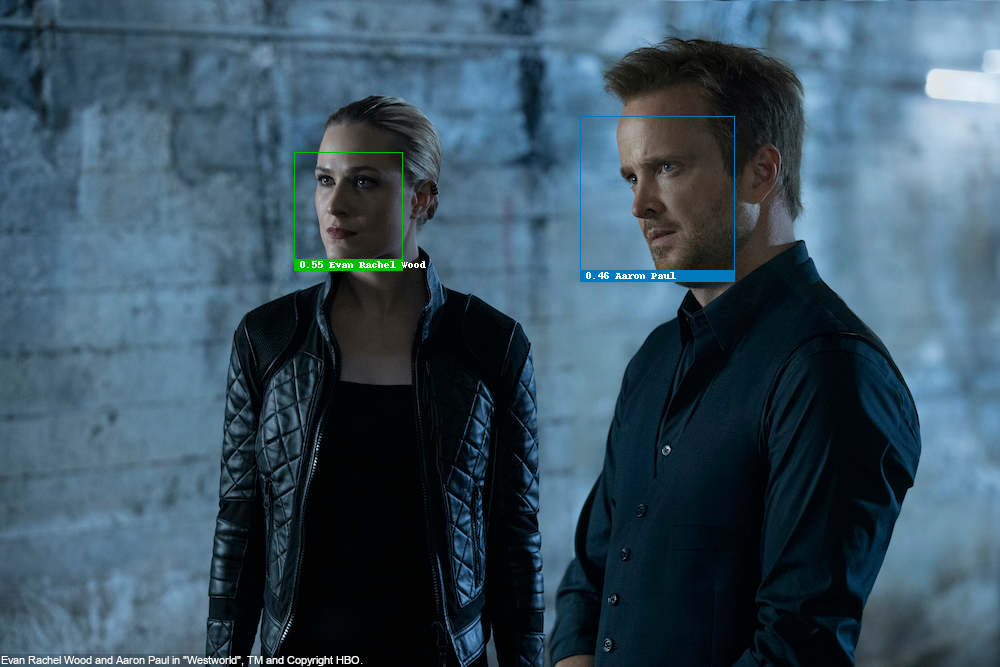
Face recognition test with Evan Rachel Wood as Dolores Abernathy and Aaron Paul as Caleb Nichols in “Westworld”, recognized correctly 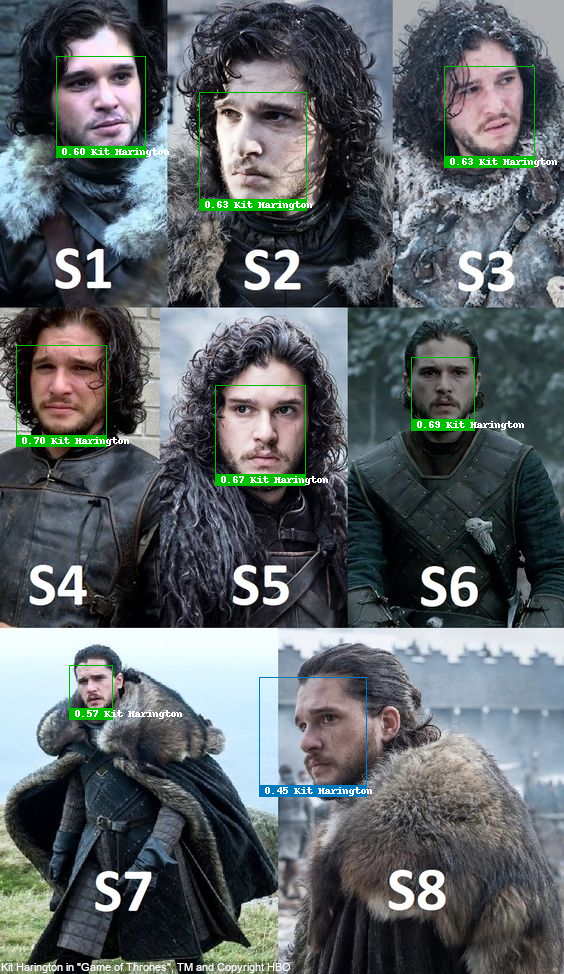
Face recognition test with Kit Harington as Jon Snow, over Season 1 to 8 of “Game Of Thrones”, recognized correctly 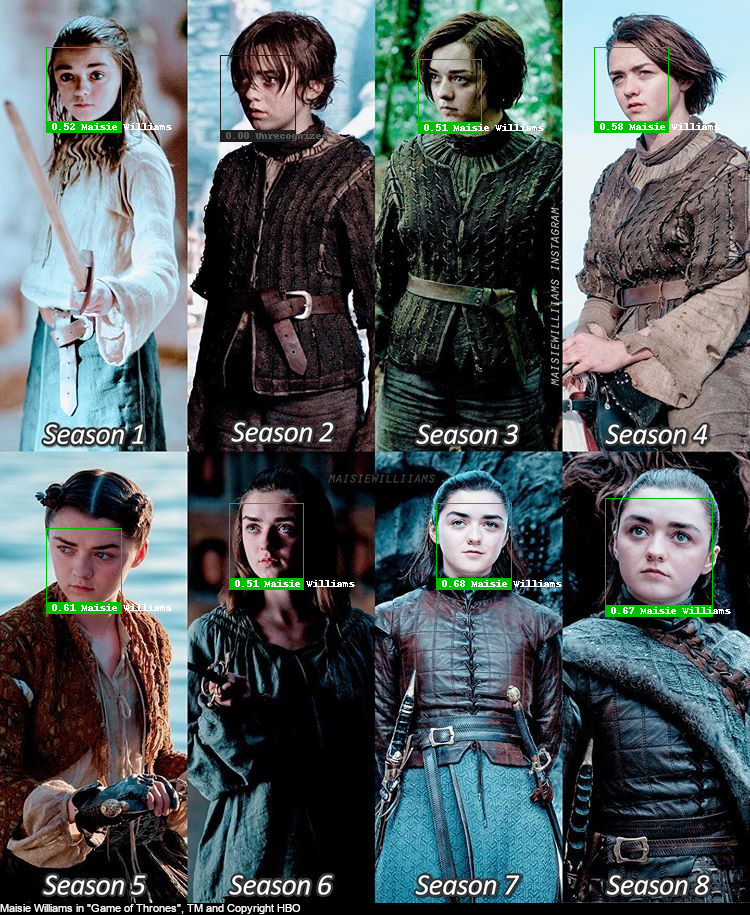
Face recognition test with Maisie Wiliams as Arya Stark, over Season 1 to 8 of “Game Of Thrones”, recognized mostly correctly 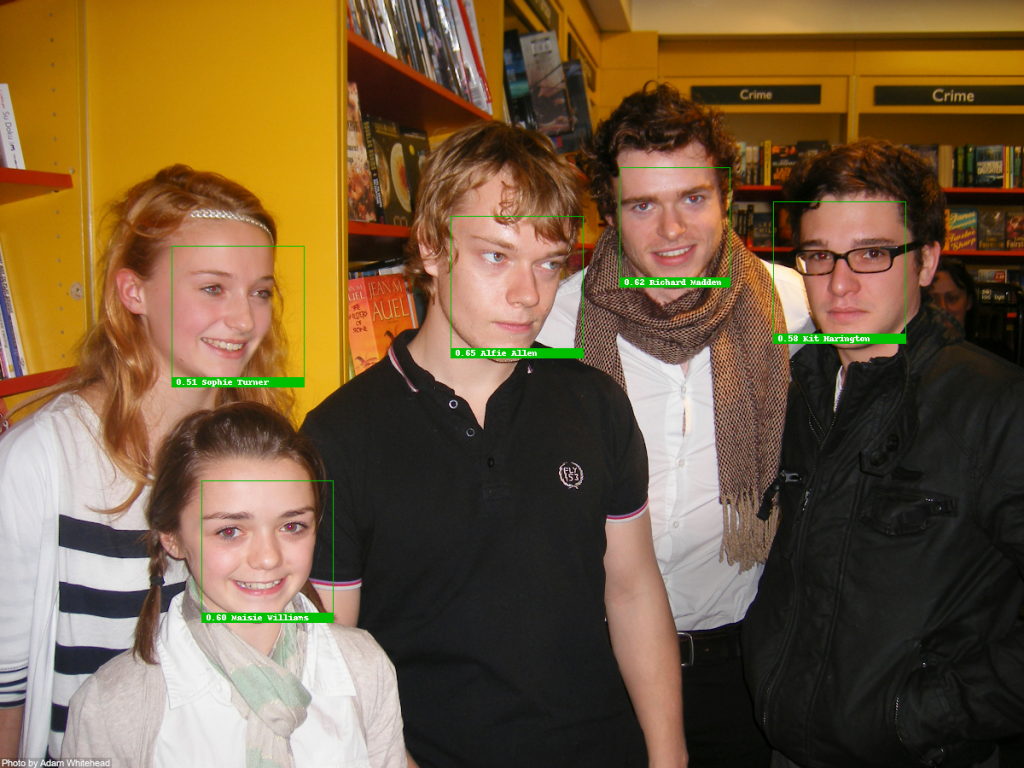
Face recognition test with Sophie Turner, Maisie Wiliams, Alfie Allen, Richard Madden, Kit Harington from 2009, recognized correctly 
Face recognition test with Tom Hanks in “The Money Pit” (1986), recognized correctly 
Tom Hanks in “Cast Away” (2000), TM and Copyright 20th Century Fox Film Corp. 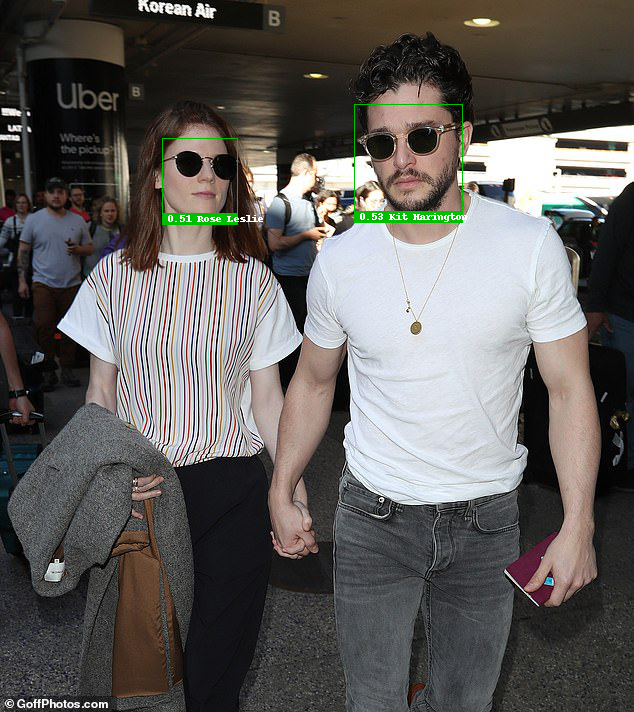
Face recognition test with Rose Leslie and Kit Harington, both wearing sunglasses, recognized correctly 
Face recognition test with Anthony Hopkins as Hannibal Lecter of The Silence of the Lambs (1991), recognized correctly


The success of recognition with sunglasses and on 11 years old photos surely surprised me, especially with the high confidence rate.
But what happens if we have have incomplete data? For example if we only know a subset of the people we try to recognize on photos? Well, I have removed some of the actors from the known_faces directory and ran the script again.
(Click on a photo to open the gallery.)

Face recognition test with Richard Madden and Kit Harington from 2009, Madden recognized incorrectly due to missing data 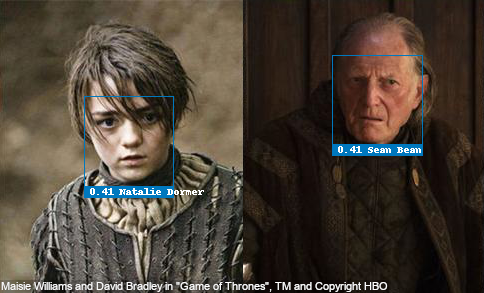
Face recognition test with Maisie Wiliams as Arya Stark and David Bradley as Walder Frey of “Game Of Thrones”, recognized incorrectly due to missing data 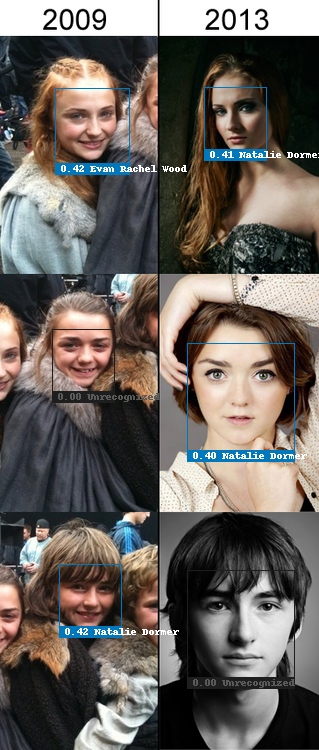
Face recognition test with Sophie Turner, Maisie Williams and Isaac Hempstead Wright, recognized incorrectly due to missing data 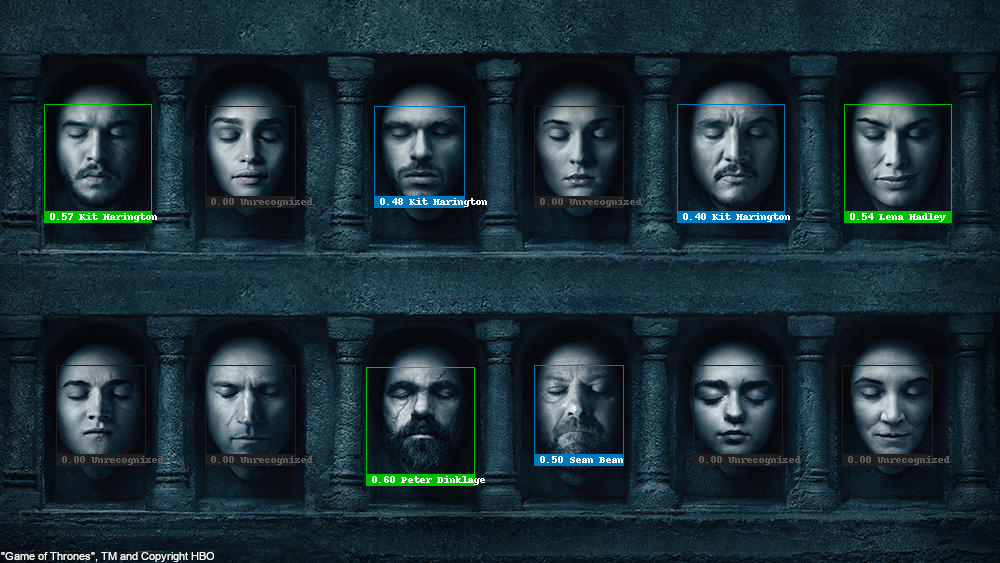
Cast of “Game of Thrones” with too many Kit Haringtons. Some of the faces are recognized incorrectly due to missing data
This looks way worse. But of course, whether this is a spectacular failure or a hiccup depends on the parameters and the intended use.
All the incorrectly recognized faces are with less than 0.5 confidence (distance higher than or equal to 0.5), tuning this parameter can get rid of them but then some of the correct recognitions will be cut to.
And also, intended use: for a just for fun project you’d just need to tune them and then handle the clusters of unrecognized faces. For something more serious, don’t. Just don’t use facial recognition.
Recognizing a face based on a 2D image (from a video or photo) is way too easy to trick and also unreliable, unsuitable for any serious use. A few articles from 2020 alone:
- Wrongfully Accused by an Algorithm – New York Times
- Facial recognition fails on race, government study says – BBC
- Facial-recognition software fails to correctly identify people ‘96% of the time,’ Detroit police chief says – Business Insider
- Outrage over police brutality has finally convinced Amazon, Microsoft, and IBM to rule out selling facial recognition tech to law enforcement. […] – Business Insider
So while it is fun and can yield surprising results, it heavily depends on the quality of the input, fine-tuning and the algorithms used – even for the big guys like Amazon, Microsoft and IBM.
But by all means, try it, play with it, create your next pet project – but be aware of the possible downsides as well.
Copyright info: Each photo was used for educational purposes only and I tried my best to have the correct copyright info displayed, please contact me and I will correct them or remove the photo if needed.
I don’t normally comment on blogs.. But nice post! I just bookmarked your site
What is the term for arranging detected faces into groups based on their facial features?
I think in general it is called clustering or grouping.