The 101hero is a pylon 3D printer that had a campaign on both IndieGoGo and Kickstarter with early bird prices of US$ 49 and retail price of US$ 99 on 101hero.com.
First of all, the 101hero team’s goal was to create “The World’s Most Affordable 3D Printer” as they said and not the the printer you should start your 3D printing adventures with and this can be seen in a few places. Nevertheless, the printer is functional and the prints can turn out surprisingly nice if one is willing to spend enough time and don’t mind the hassle but if you’re new to 3D printing and you want a printer that works out-of-the-box, this one is not the best choice.
I backed the IndieGoGo run and have received the printer in January, 2017. I am new to 3D printing this is the first one I bought and the first one I ever printed with, In these posts I will share my experiences, tips I find useful and caveats.
The printer comes in two versions: the CV (Consumer Version) and DV (Developer Version). The only difference is that the DV has a USB port and can be connected to a computer while the CV can only print from SD card (which is not part of the package).

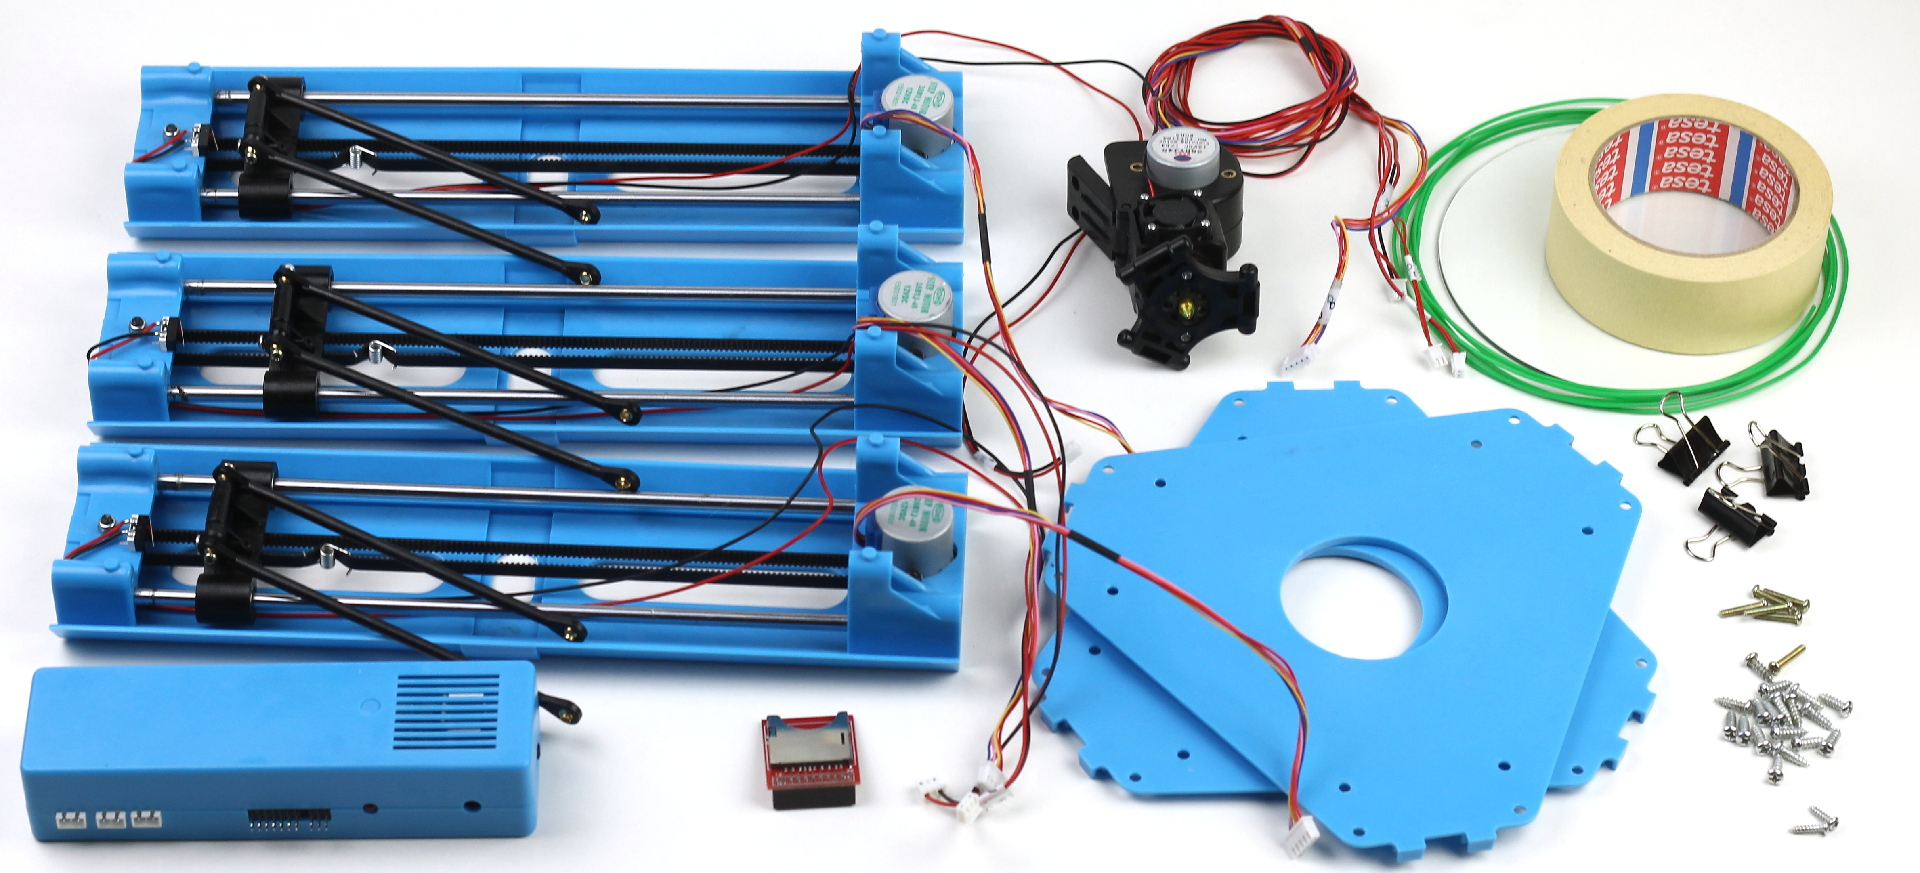
Assembling the 101hero is pretty straightforward but before getting started check all the components that should be in the box:
- 3 pylon assembly – they are identical except for the length of the wires and labels, there should be an end-stop microswitch (to detect that the carriage reached the top of the pylon), two slide rods, a belt, a carriage (fixed to the belt, sliding on the two slide rods, fixed to effector rods) and a motor
- 1 controller box
- 1 SD card slot
- 2 plates – one for the base and one for the top
- 1 extruder assembly with effector – the “head”
- 1 bunch of filament – the printer comes with black or white, I bought the green separately
- 1 roll of painter’s tape – to help adhesion of the first layer printed
- 1 glass plate
- 3 paper clips – to fix the glass plate to the base
- 6 pcs M3x10 machine screws (PH1 head) – for the carriage-straw/strand and straw/strand-extruder assembly
- 18 pcs M4x12 self-tapping screws (PH1 head) – for pylon-base and pylon-top
- 2 pcs M3x12 self-tapping screws (PH1 head) – for door fixing on extruder assembly (identical to the ones used for end-stops in early editions)
In early editions the end-stops are hitting against M3x12 self-tapping screws with PH1 heads, I have read that later they switched to Hex Socket (aka Allen) types.
Before assembling the printer I would like to tell you some basics and recommend to do further checks.
When the printer is powered it looks for a file called “101hero” on the SD card and starts to execute it (i.e. printing, moving, etc.). The file is a G-code file and has no extension, it is just “101hero” (when saving the file using Notepad on Windows to prevent it appending “.txt” change the “File type” drop-down to “All files (*.*)” or put the file name between quotes).
The button on the controller box simply resets the printer that causes it to re-initialize and looking for the file and execute it.
The pylons are identical except for the cable lengths and the labels that are on them, that is you can have them swapped and even replaced from a different package, they will work. One important note however – the end-stops are used to detect when the carriages reach the top of the pylon so the motor-end-stop pairs need to be kept consistent, if they are not then the controller will keep moving the carriage until you turn the power off.
A big warning: the power is not only sourced from the power connector but from USB as well – that is as long as your printer is connected over USB it will power the board – regardless of the power switch! Yeah, if you slide the switch to OFF the board will still be powered, although the printer will not operate properly due to the low current but you can damage the printer if you short something.
One more big warning: the controller has no flyback diodes to protect itself from inductive spikes. Simply put: only move the carriage slowly by hand because the motor generates current that will be fed back to the controller. If the current is too high (due to moving fast) it might damage your controller. Although I have not tested it yet, it might also be fed back over USB damaging your computer as well.
The printer has basically no customer support. As of March, 2017 the 101hero team is still busy shipping packages and really unresponsive to support questions, however there is a really active group on Facebook, the 101 Hero (Unofficial) and a forum at 101user.com.
Now it is time to start connecting things, meet me in part two.